Manipulation
Overview
Developing object interaction for Virtual Reality is a very challenging task. In traditional applications one normally gets close an interactive object and presses a key that will trigger an animation. Sometimes these interactions can get more complicated and procedural animation is required to make sure the interaction looks more natural.
In Virtual Reality you are not looking at the world from a small window, you are inside the world.
Things work on a very different scale, and you rely on your own hands to touch things. You no longer look at a screen when you interact with something, you are moving your real hands close to an object to grab it. You can even try to cheat since the physical limitations do no longer apply. There is nothing that prevents you from punching through a virtual wall since there is no wall in the real world that will stop your hand. Well… Sometimes accidents happen and you break your TV by mistake.
All this makes it very difficult to create interactive VR applications from scratch without any help.
One of the biggest challenges of UltimateXR was creating a manipulation system that would feel natural. Bad interactions immediately throw somebody off and ruin an application. Good interactions create memorable experiences and that is what we are aiming for.
In this section we will show you which components play a significant role in manipulation using UltimateXR:
- UxrGrabber: Component added to each hand of an avatar enabling it to grab objects.
- UxrGrabbableObject: Component that enables an object to be grabbed.
- UxrGrabbableObjectAnchor: Component that can be used to place a UxrGrabableObject on.
Prerequisites
- Having an avatar instantiated in the scene, preferably with some grab poses already added. It should have a grab action with a default grab pose set in the UxrStandardAvatarController component in the avatar root object.
You can use any of the UltimateXR avatar prefabs located in /UltimateXR/prefabs/avatars
UxrGrabbableObject
The UxrGrabbableObject component can be added to an object so that it becomes grabbable by an avatar.
Let’s create a small sphere with scale x=0.07 y=0.07 z=0.07 and add the UxrGrabbableObject component. After adding the component, it should already work out-of-the-box. This means that tuning grabbing behavior becomes changing the default parameters instead of figuring out how to configure it from scratch.
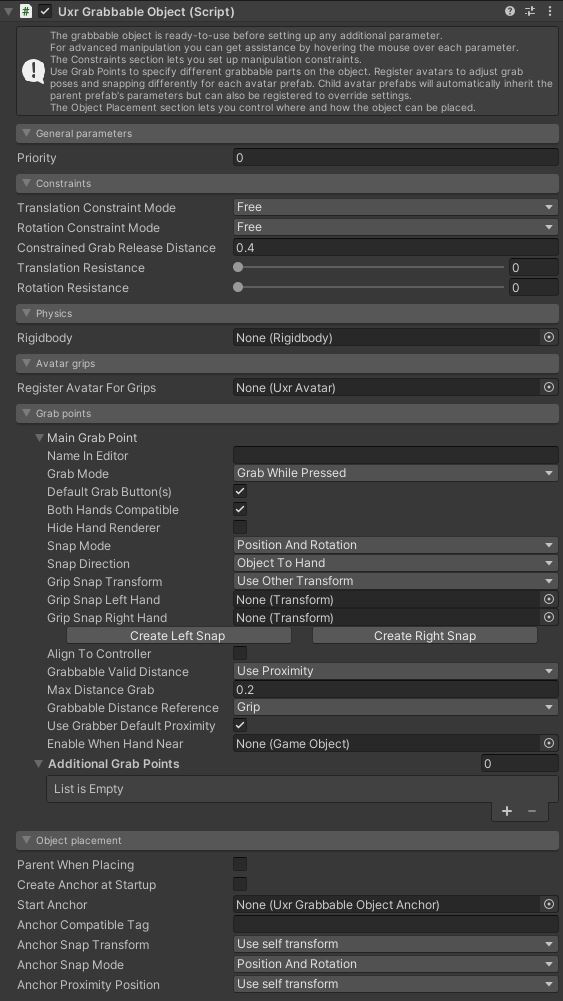
By pressing Play you should be able to grab the ball and move it around. It will snap to the hand but will not fit.
At this point you have 2 main choices:
- Enable the Hide Hand Renderer option in the UxrGrabbableObject component. This will hide the hands while the object is being grabbed. It removes the need to create specific grab poses and works surprisingly well. Owlchemy Labs, a talented team of Virtual Reality videogame developers, called this “Tomato Presence”; the concept that hand presence can be maintained using a stand-in object.
- Register the avatar to use grip poses by dragging it to the Register Avatar for Grips field.
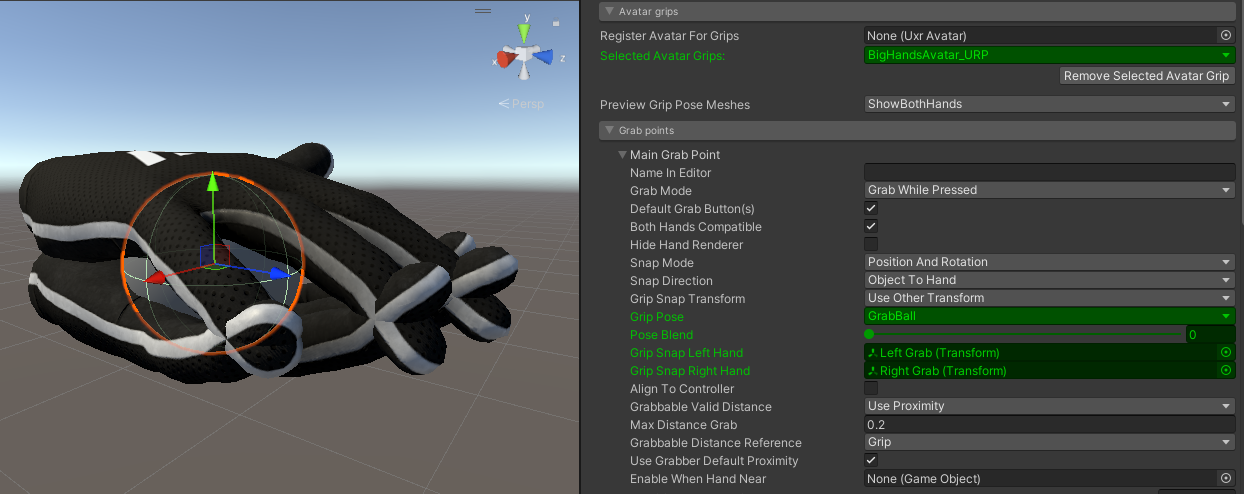
Using grab poses
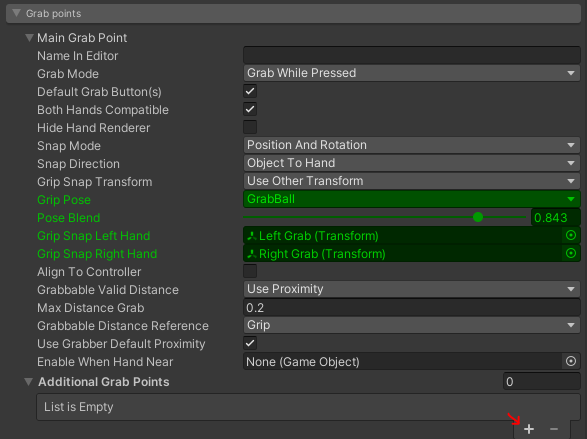
Let’s continue with the previous example and register the avatar to use grab poses. The inspector will now look like this:
![]()
The green fields now tell you which fields have specific values for the selected avatar. Each avatar that is registered will have its own set of values for the green fields, which in this case means that every avatar can specify its own pose and snap points for the left and right hand.
This is a powerful feature that favors inclusion and is important in cases where totally different avatars need to interact with the same objects.
If you used any of the UltimateXR avatar prefabs you can select the GrabBall pose that is included.
By pressing the Create Left Snap and Create Right Snap buttons you will create two transforms that will hang from the grabbable object that will allow you to move where the ball snaps to the hand when it is grabbed.
At this point you should be able to see a preview mesh in the Scene Window for the grab pose of both hands.
If you select the newly created Left Grab or Right Grab object, you will notice that the preview will switch to the snap that is selected.
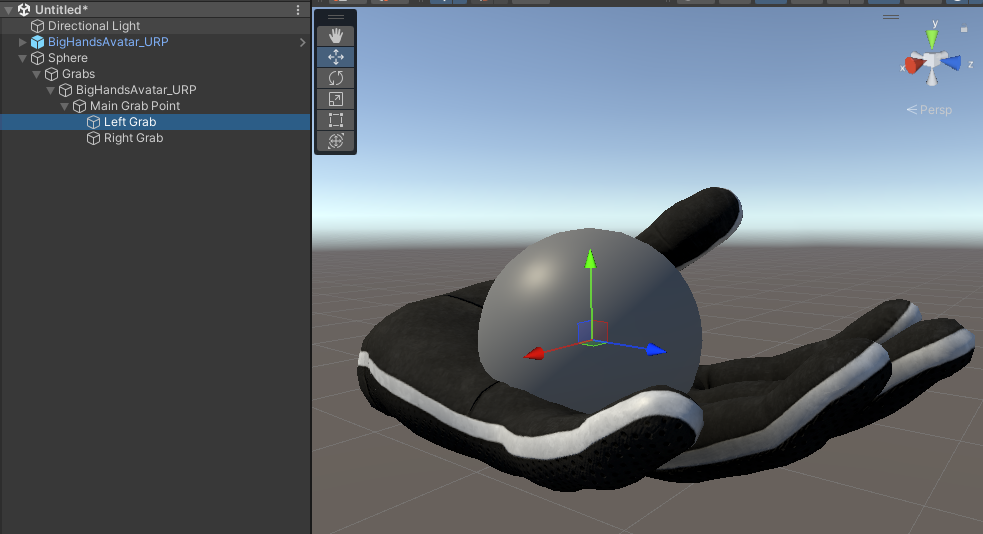
That is because a UxrGrabbableSnapTransform component was added, that will also let you adjust the blend value since the GrabBall pose is a blend pose.
Now, by adjusting the blend value and moving the transform around, you can easily place how the object will be grabbed. There are additional utilities that will let you copy/mirror the position and orientation.
With some small adjustments you should now be able to end up with a grip that fits the sphere perfectly.
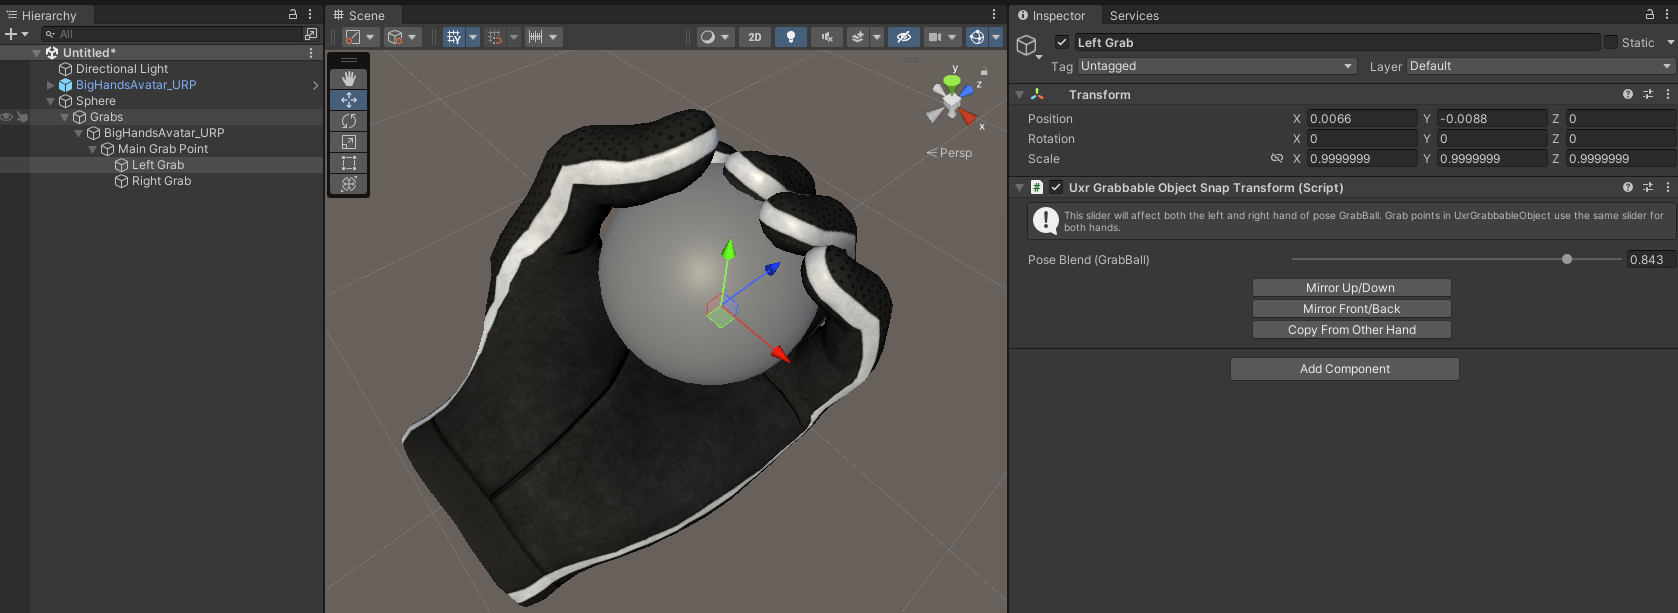
Do this for both hands, keeping in mind that the blend pose value is shared between left and right, and you should now be able to check in play mode your improvements.
You can add more grab points to grabbable objects so that they can be grabbed from many angles and using different grips. The framework will be able to determine the grip that will be used based on the position and orientation of the object. Click on the + at the end of the Grab Points section to add new grab points.
A good practice is to name each grab point so that the snap transforms that are generated later have meaningful names. This will make it easier for other developers to understand how the grabs are structured.
Sometimes it is easy to end up with many different grab points that end up cluttering the scene window:
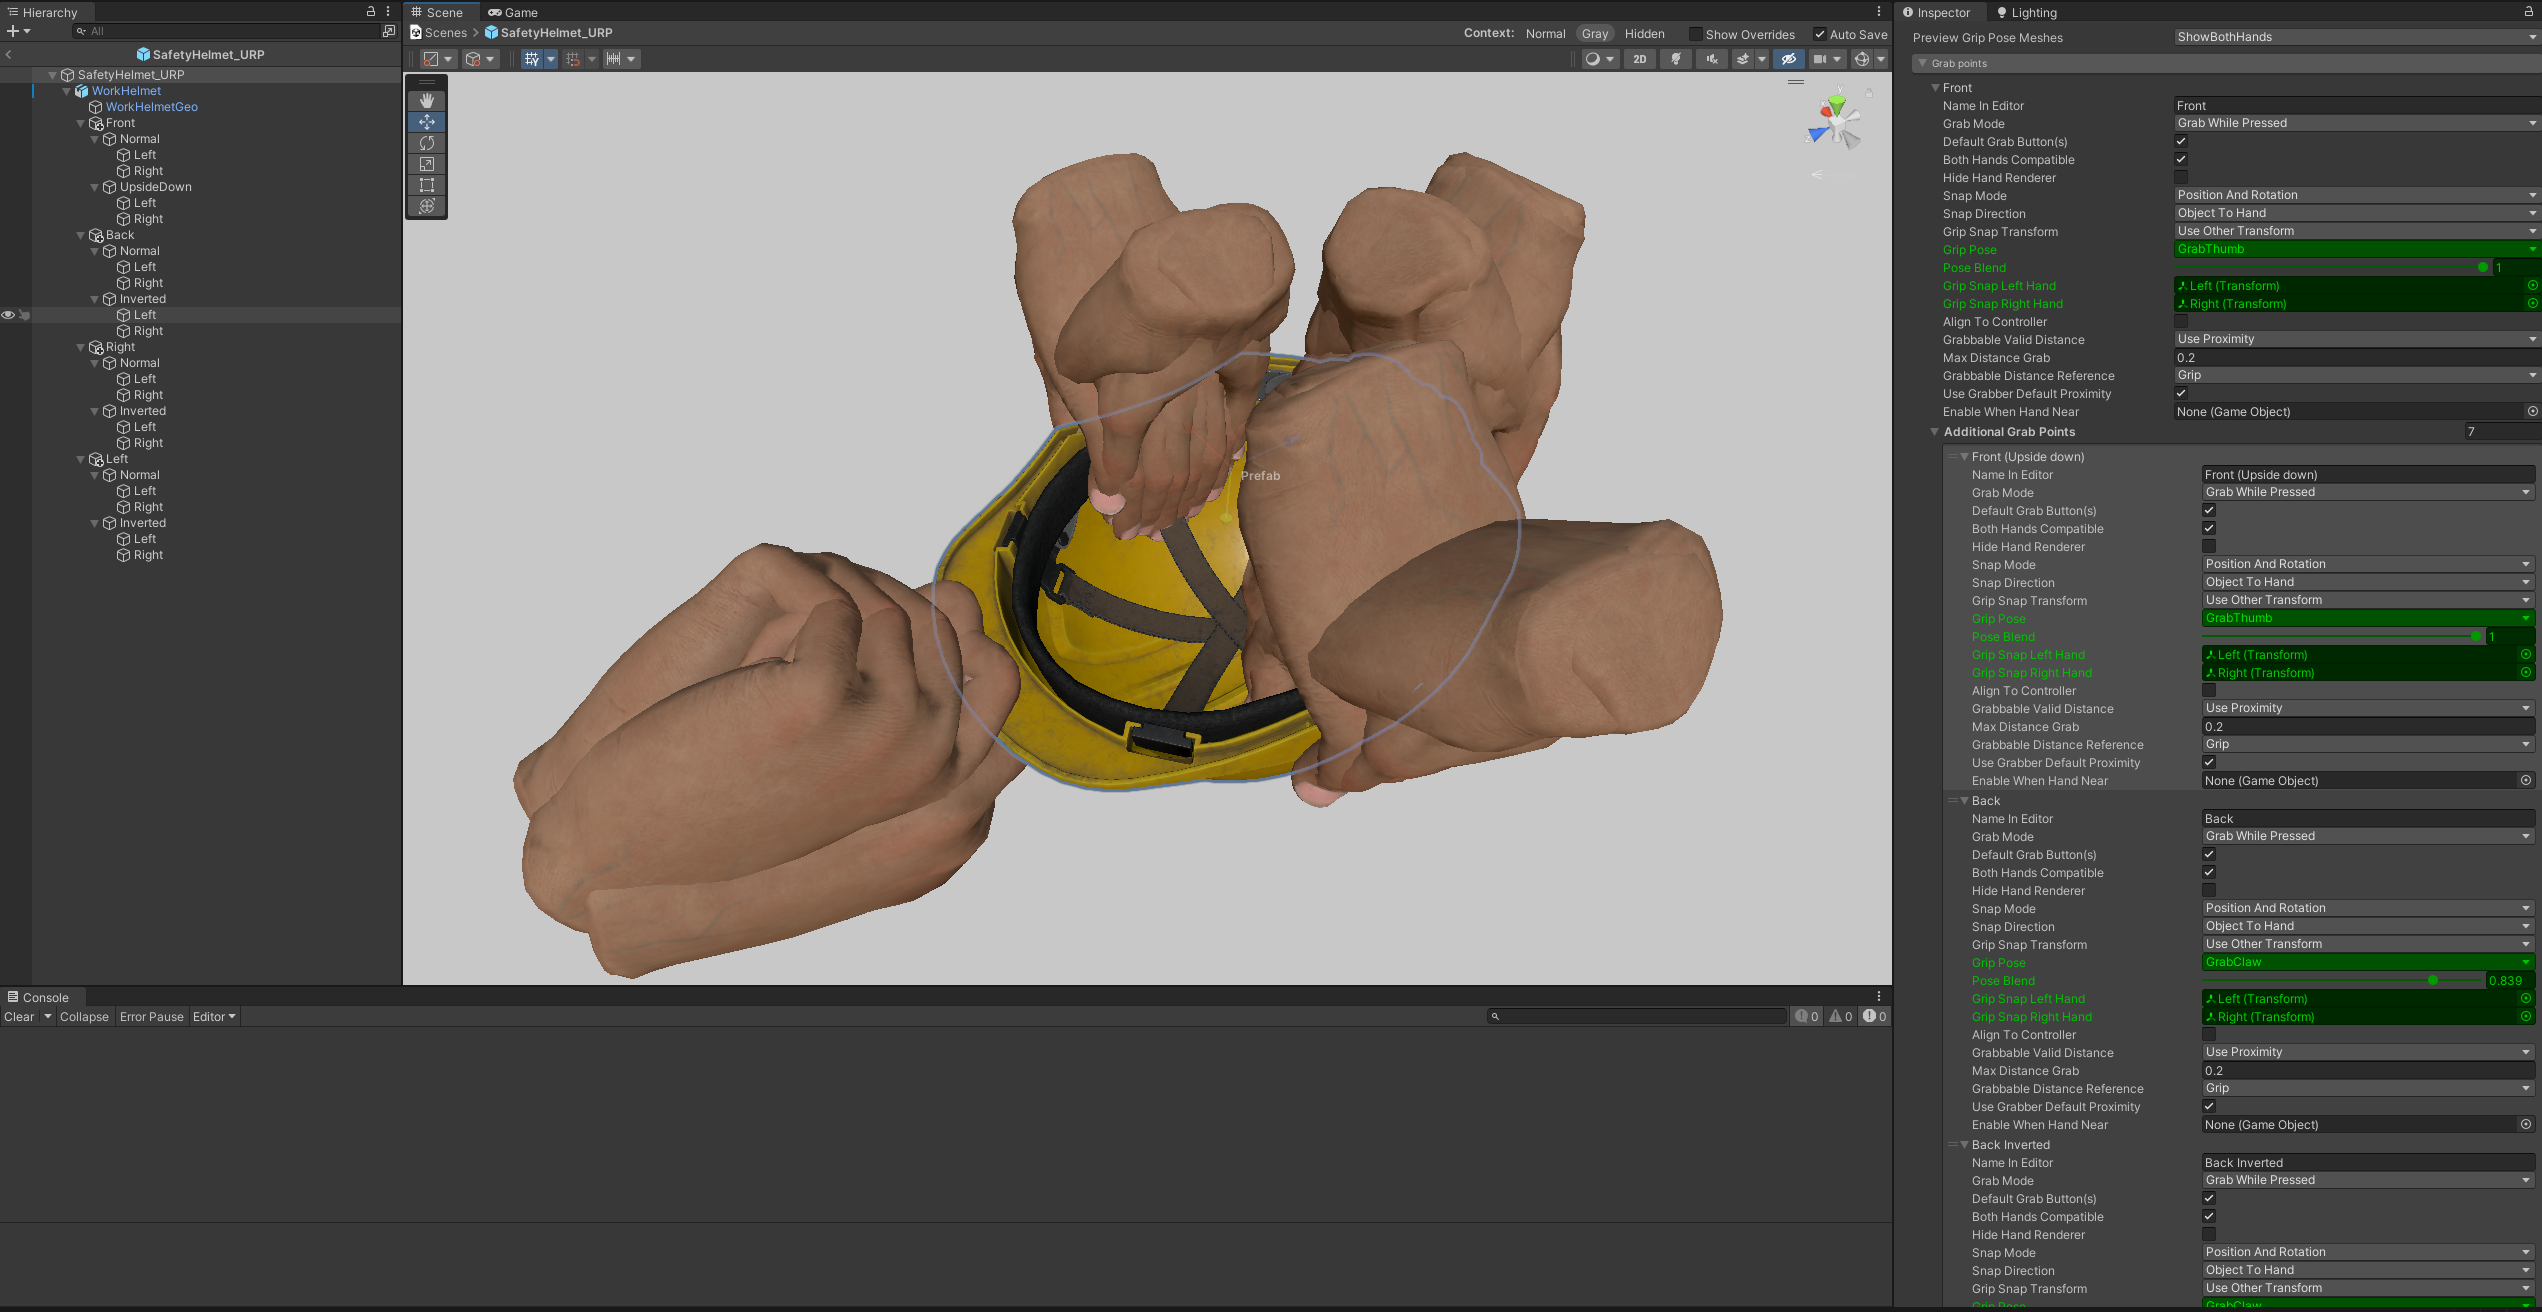
You can filter out grab previews by:
- Collapsing the grab points you don’t want to preview.
- Changing the Preview Grip Pose Meshes parameters switching between showing only the left hand, the right hand, both or none.
Here is the same view with all grab points collapsed and filtering out the left hand
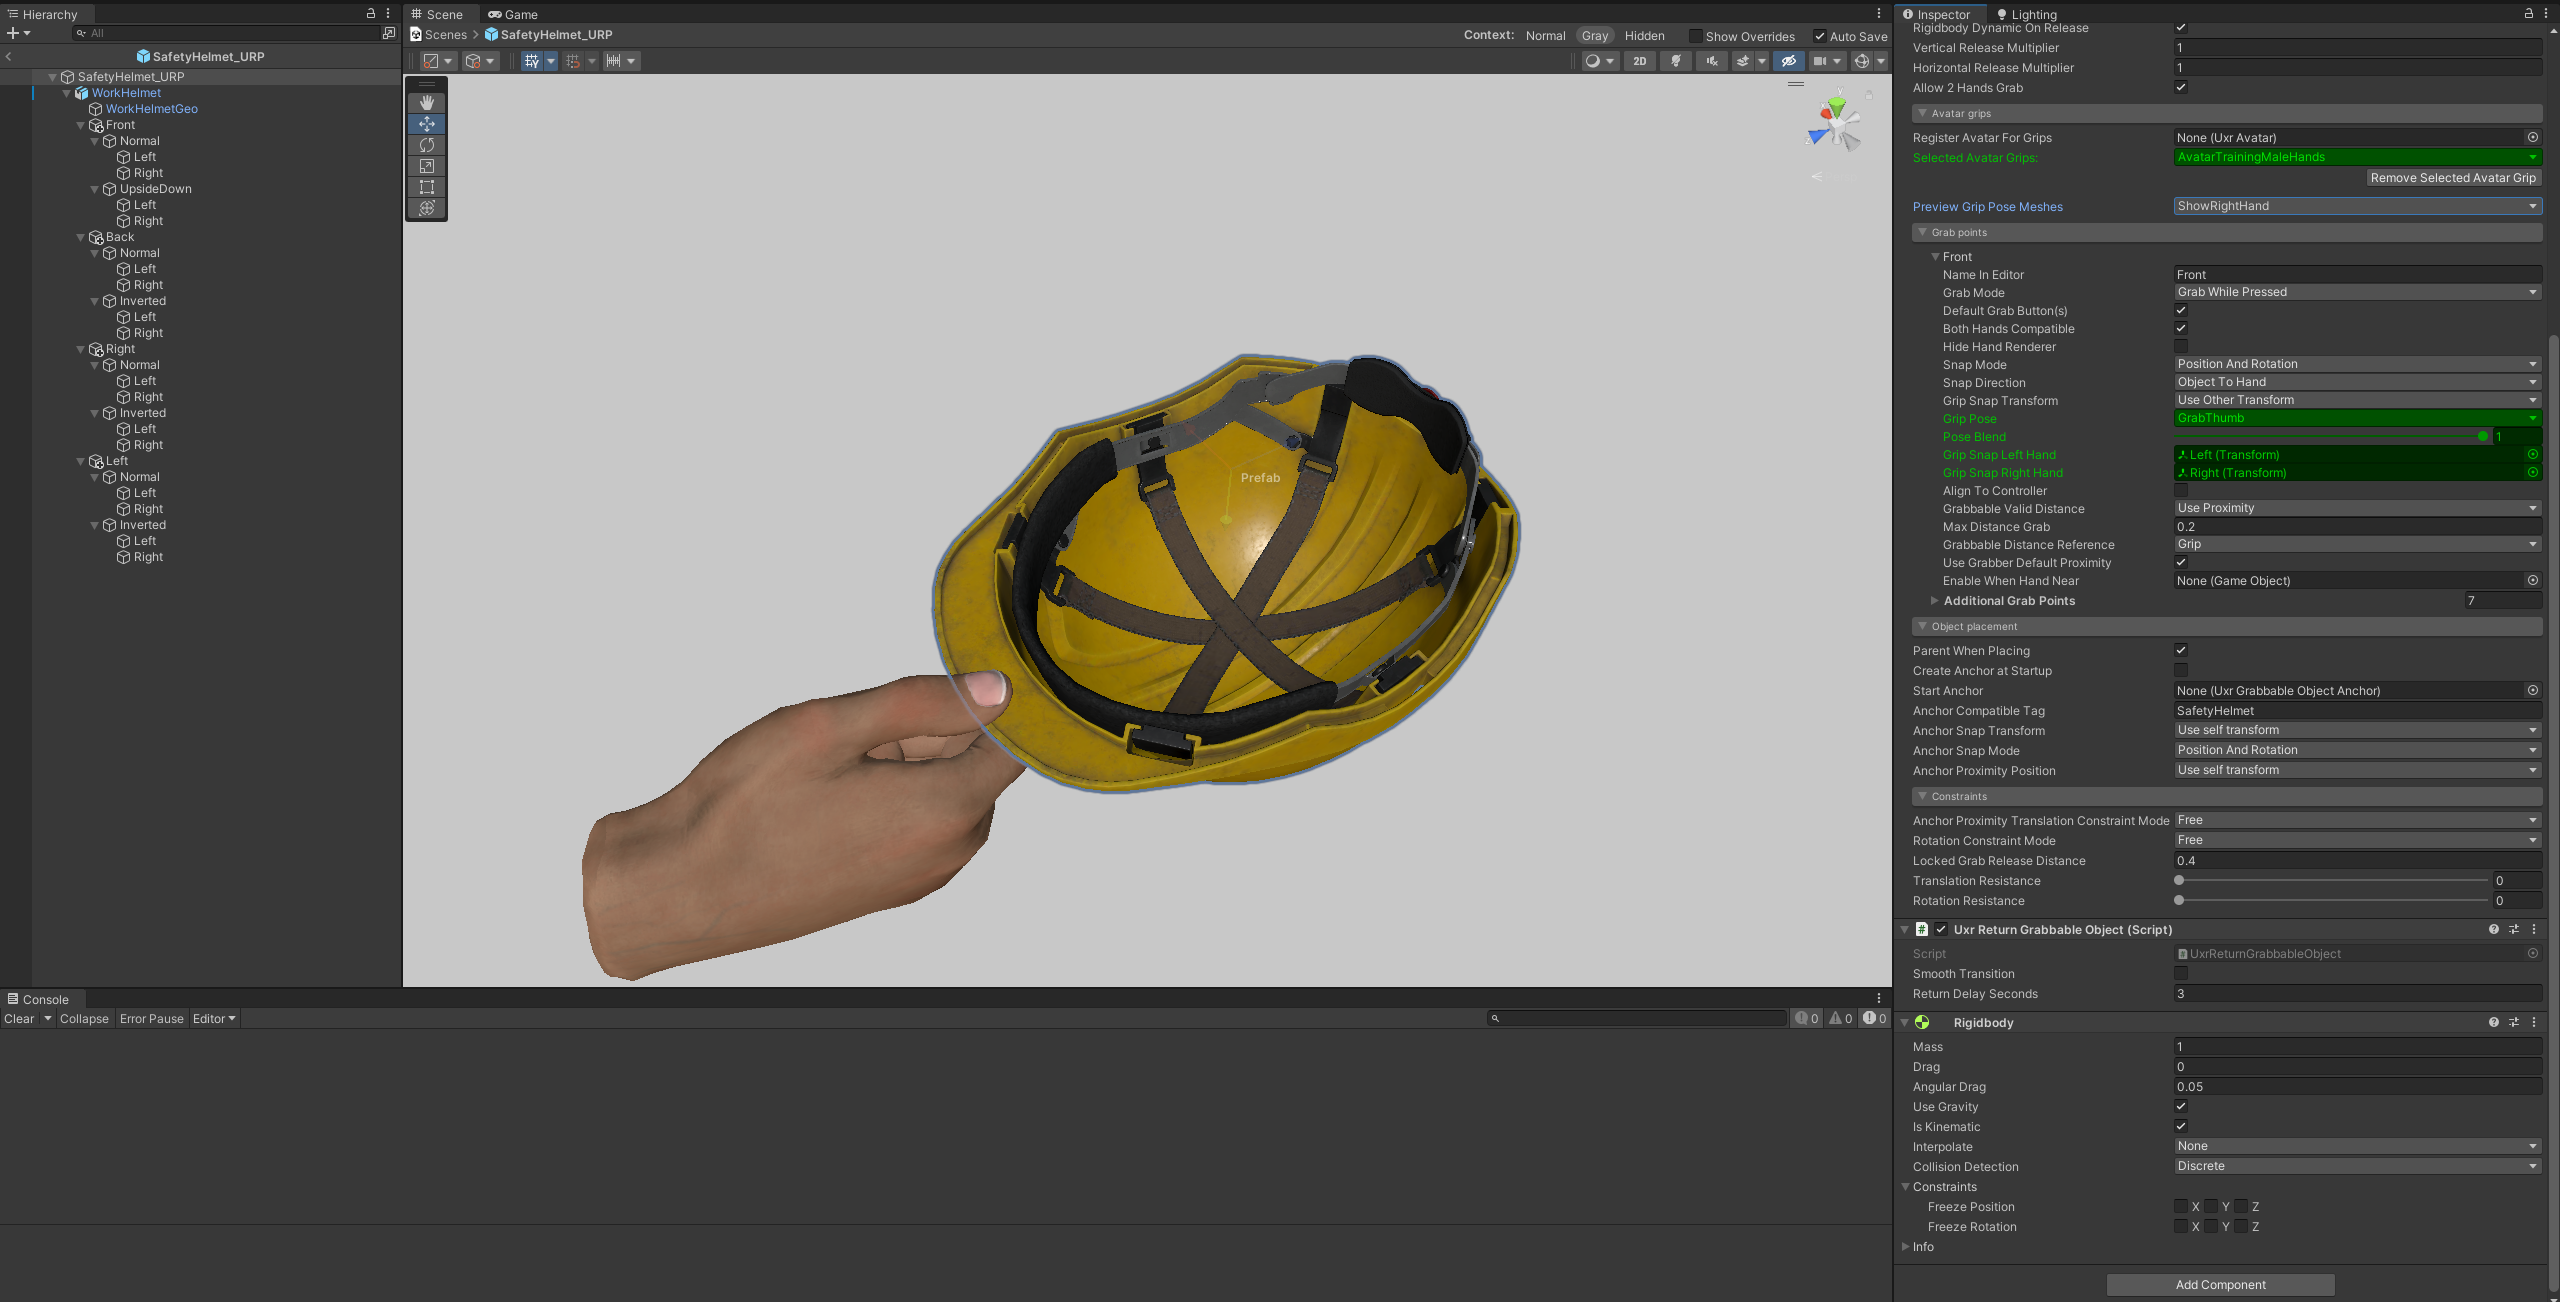
Here are some other tips that can be useful:
- To be able to see the preview grab meshes, it is required to have an avatar of that type available instantiated in the scene.
- You can edit grab poses using the Hand Editor and the preview poses will be updated in real-time.
- If you want to quickly settings from one grab point to another you can do so using Unity copy & paste of the whole grab point set.
We will keep updating this documentation with more advanced tutorials and step by steps. Meanwhile, here is the complete reference guide. You can also hover on the component fields; every item has its own tooltip.
Parameter reference
- Register Avatar for Grips: Registers an avatar to have the possibility to have different grip parameters for each avatar. This allows to fine-tune how different hand shapes and sizes wrap around the same object. Parameters that can be adjusted for each avatar will be colored to help in the process.
- Selected Avatar Grips: Switches the avatar currently selected to edit its grip parameters. Being able to register different avatars allows to fine-tune how different hand shapes and sizes wrap around the same object. Parameters that can be adjusted for each avatar will be colored to help in the process.
- Ignore Parent Dependency: In objects with grabbable parents, mark this to ignore the parent constraint and tell this object is independent.
- Priority: By default, closer objects will be always grabbed over far objects. Using priority, objects with higher priority will always be grabbed if they are in range.
- Translation Constraint Mode: Allows to constrain the translation of this object while being grabbed.
- Restrict To Box: Allowed volume where this object’s pivot will be allowed to move while being grabbed.
- Restrict To Sphere: Allowed volume where this object’s pivot will be allowed to move while being grabbed.
- Translation Offset Min: Minimum allowed offset along the local axes.
- Translation Offset Max: Maximum allowed offset along the local axes.
- Rotation Constraint Mode: Allows to constrain the rotation of this object while being grabbed.
- Rotation Angle Limits Min: Minimum allowed rotation offset degrees around the local axes.
- Rotation Angle Limits Max: Maximum allowed rotation offset degrees around the local axes.
- Rotation Provider: Controls how an object with constrained position is rotated. Auto will to try to infer the most appropriate rotation provider automatically based on the object shape and the grip. HandOrientation will rotate the object directly by rotating the hand, useful for knobs or small joysticks where the torque is applied mostly by twisting the wrist. HandPositionAroundPivot will rotate the object using the position of the hand around the pivot instead, useful for levers, bigger joysticks, steering wheels and similar objects where the torque is applied using hand leverage around the rotation axis.
- Longitudinal Axis: Specifies which axis, in the object coordinate system, is the longitudinal axis. The longitudinal axis is the axis that goes from head to tail along the object.
- Needs 2 Hands to Rotate: When manipulation mode is set to Rotate Around Axis this will tell if the user will be able to rotate the object using one hand only or the object needs to be grabbed with two hands to rotate it.
- Constrained Grab Release Distance: Maximum allowed distance of a locked grab to move away from the grab point before being released.
- Translation Resistance: Resistance of the object to being moved. Values higher than zero may be used to simulate heavy objects.
- Rotation Resistance: Resistance of the object to being rotated. Values higher than zero may be used to simulate heavy objects.
- Rigidbody: References the object’s rigidbody when physics are required. The object will be made kinematic when grabbed and optionally dynamic when released.
- Rigidbody Dynamic on Release: When a rigidbody is specified it controls whether it will be marked as dynamic after being grabbed and released. Otherwise, it will continue to be kinematic after being released.
- Vertical Release Multiplier: When throwing a rigidbody this parameter will enable increasing or decreasing the actual release velocity (vertical component).
- Horizontal Release Multiplier: When throwing a rigidbody this parameter will enable increasing or decreasing the actual release velocity (horizontal component).
- Allow 2 Hands Grab: When more than one grab point has been specified, this parameter will tell if the object can be grabbed with two hands at the same time.
- Preview Grip Pose Meshes: Will show/hide the preview grip pose meshes in the Scene Window.
- First Grab Point Is Main: Whether the first grab point in the list is the main grab in objects with more than one grab point. When an object is grabbed with both hands, the main grab controls the actual position while the secondary grab controls the direction. Set it to true in objects like a rifle, where the trigger hand should be the first grab to keep the object in place, and the front grab will control the aiming direction. If false, the grab point order is irrelevant and the hand that grabbed the object first will be considered as the main grab.
- Grab Point: Parameters of the main grabbing point.
- Additional Grab Points: Parameters of the additional grabbing points which enables grabbing the object using more than one hand.
- Name In Editor: The display name showed for this grab point in the editor’s foldout label.
- Grab Mode: Whether the object will a) Be grabbed while keeping the grab button pressed, b) Keep being grabbed until the grab button is pressed again or c) Keep being grabbed until another hand grabs it or it is requested through scripting.
- Default Grab Button(s): Whether the object is grabbed using the grab button specified in the Avatar’s Standard Controller component. This allows to override the grab button for certain objects.
- Grab Button(s): The button or combination of buttons that will be required to grab this object.
- Both Hands Compatible: Whether this object can be grabbed using both hands.
- Compatible Hand: The hand/controller this object can be picked with if the controller can only be grabbed with one hand.
- Hide Hand Renderer: Whether the hand renderers specified in the UxrGrabber component should be hidden while grabbing.
- Grip Pose: Selects the hand grip pose to use for the selected avatar/grab point combo.
- Pose Blend: Move the slider to open/close the grip and adjust it to the object size and shape.
- Grip Snap Left Hand: The transform that will be aligned to the left UxrGrabber transform if AlignToHandGrabAxes and/or PlaceInHandGrabPivot are active.
- Grip Snap Right Hand: The transform that will be aligned to the right UxrGrabber transform if AlignToHandGrabAxes and/or PlaceInHandGrabPivot are active.
- Create Left Snap: Create a dummy as left snap transform.
- Create Right Snap: Create a dummy as right snap transform.
- Snap Mode: How this object’s grab-alignment-transform axes will snap to the UxrGrabber transform after being grabbed.
- Snap Direction: Whether this object will be snapped to the hand, or the hand will snap to the object.
- Grip Snap Transform: Whether the grabbed object will be aligned with the UxrGrabber transform while being grabbed or another snap transform will be used.
- Align To Controller: Aligns the object to the controller when it is being grabbed. This is very important for objects like weapons where aiming correctly is critical.
- Align To Controller Axes: By default, if no transform specified, it will use the objects axes as reference to align (z forward, etc.). Otherwise, it can use another transform as reference.
- Grabbable Valid Distance: Tells which method to use to detect if a UxrGrabber can grab this object.
- Grabbable Valid Box: Volume the UxrGrabber needs to be in to grab this object.
- Max Distance Grab: The maximum distance the UxrGrabber can be to be able to grab it. This is called the proximity.
- Grabbable Distance Reference: The reference from the grabbable object that will be used to know if the UxrGrabber is close enough to grab it.
- Grabbable Proximity Transform: Position the UxrGrabber needs to be close to to grab this object.
- Use Grabber Default Proximity: Uses the grabber’s own transform for proximity computation (distance from hand to object). Optionally you can specify different transforms in the grabber component for more precise interactions, for example one for precise distance to a dummy in the palm of the hand and other for precise distance to the dummy near the index finger.
- Grabber Proximity Index: Allows to specify a different transform for proximity computation (distance from hand to object). This index tells which transform from the UxrGrabber component’s proximity list is used.
- Enable When Hand Near: Optional GameObject that will be enabled if a hand is close enough to grab this object.
- Parent When Placing: Will parent this GameObject to the UxrGrabbableAnchor when placing it.
- Create Anchor at Startup: Will generate an UxrGrabbableObjectAnchor during startup and place this object on it, keeping the position and rotation. If the object has an Anchor Compatible Tag assigned, the tag will be the only compatible tag allowed by the anchor. This is useful to have a fixed anchor where the object can be placed back again after picking it up.
- Start Anchor: If this object is initially placed on an UxrGrabbableObjectAnchor, select here which anchor it is placed on.
- Anchor Compatible Tag: String identifier that can be used to filter which objects can be placed on which UxrGrabbableObjectAnchor objects.
- Anchor Snap: The transform where objects will be snapped to when being placed.
- Anchor Snap Mode: How this object will snap to the UxrGrabbableObjectAnchor transform after being placing on it.
- Anchor Proximity Position: The reference that will be used to know if this object is close enough to an UxrGrabbableObjectAnchor to place it there.