Avatar
Adding an Avatar to the scene
The first and most important requirement in your app is adding an avatar to your scene(s).
An avatar is the visual representation of a user in the application. The minimal representation requires a single camera that allows the user to look around. More elements can be added such as hands to interact with the environment or a half/full body to have a more complete representation.
A special avatar is the local avatar, which is the avatar controlled by the user wearing the headset and input controllers. Non-local avatars are other avatars instantiated in the scene but not controlled by the user, either other users through the network or special cases such as automated replays.
There are two ways to add an avatar to the scene:
- Using any of the built-in avatar prefabs provided by UltimateXR
- Creating your own avatar from scratch.
Using an UltimateXR avatar prefab
Besides the Cyborg avatar that is used in the example scene, UltimateXR comes with 2 main avatar prefabs:
- BigHandsAvatar
- SmallHandsAvatar
They can be found in the UltimateXR/Prefabs/Avatars folder.
The _URP prefab is meant to be used in Universal Render Pipeline applications, while the _BRP variant is for applications using the Built-in Render Pipeline.
![]()
The first question normally is, but where’s the normal hands avatar? The answer is there is no “normal” hand size, hand sizes can vary but in a very simplified world they can be grouped in small hands and big hands. Inclusion is one of the main goals of our avatars, and we try to support both in all our applications so that everyone feels included.
Let’s create a new scene and drag the BigHandsAvatar to it. Make sure to remove any existing camera.
You will notice this warning sign on the avatar inspector:
![]()
Click Fix to save your avatar prefab variant to a folder in your project. This is to make sure all changes will be applied to your avatar prefab variant instead of the UltimateXR avatar prefab. Since the UltimateXR prefab may be overwritten with changes during framework updates, you always want to work with a prefab variant that stores your modifications.
This has additional advantages:
- No information is lost on UltimateXR updates.
- If you are working with a version control system, it is better to have changes saved in your own prefab.
- If the UltimateXR prefab is updated with new functionality, your prefab will inherit all improvements automatically.
- Support for new devices will be added when they hit the market. This support will also be inherited by your prefab.
Now click Play. If your environment has been correctly set up and the device integration is working, you should be able to see your hands and make a fist by pressing the grab button.
![]()
You can change your appearance using the different combinations provided. You may see that inside the avatar there are glove and hand objects for each side. You can select to activate either the gloves or the hands, and assign any of the following pre-defined materials:

For the glove objects:
- BigGlovesLogoMat (URP or BRP)
- BigGlovesTechnicalMat (URP or BRP)
For the hand objects. From lighter skin to darker skin:
- BigHandsSkinType1Mat_PBR
- BigHandsSkinType2Mat_PBR
- BigHandsSkinType3Mat_PBR
- BigHandsSkinType4Mat_PBR
- BigHandsSkinType5Mat_PBR
- BigHandsSkinType6Mat_PBR
You can also create a new custom skin by creating a new material and assigning the UltimateXR/Hands/Hand shader. Make sure to assign the provided surface input textures or duplicate any of the existing hand materials to start using a reference.
If you decide to use the hand objects instead of the gloves, make sure you replace the glove renderers assigned by default in the UxrAvatar component with the hand renders:

One important thing is making sure you do not move these hands, since there is another set of “virtual” hands that they depend on. If you check in the object tree, you will notice that there is a nested prefab called BigHandsIntegration.
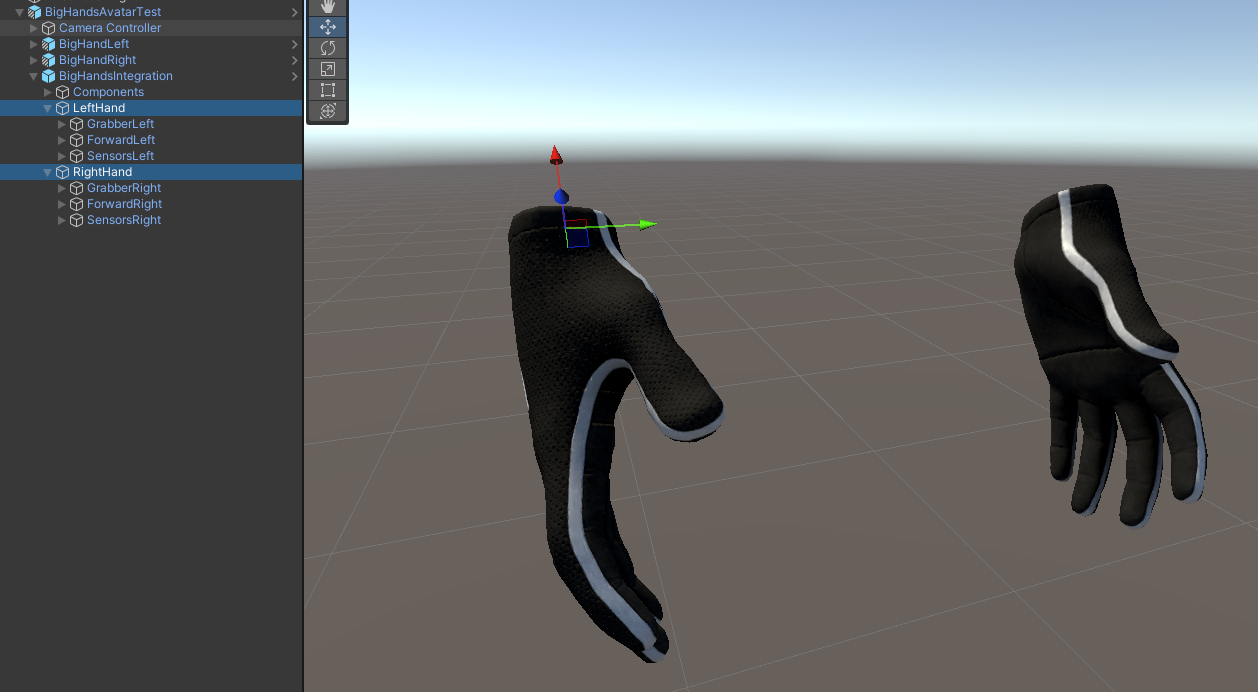
The LeftHand and RightHand objects inside BigHandsIntegration will show a green overlay hand in the scene window when selected. These hands need to be perfectly aligned with the avatar hand to work properly. Since they are already aligned, if you move any of the avatar hands they will become misaligned. If you really need to move an avatar hand for whatever reason, make sure you move the hand inside the HandsIntegration prefab to keep the alignment.
The BigHandsIntegration prefab is responsible for a lot of critical tasks:
- Providing support for all available VR controllers.
- Containing all graphics to represent VR controllers with hands that mimic user input (note: Inclusion of all controller graphics is still pending legal terms, but we hope it will be added soon).
- Knowing where to place the hands in space using tracking.
- Provide ready-to-use components for things such as grabbing and teleporting.
The fact that it can easily add all this functionality to any avatar, even to those created by the user, is one of the most important features in UltimateXR. By using a prefab, we make sure that any new controllers, graphics, or components will be available automatically after any update.
A last step is required if you opted for the hand objects instead of the gloves. Go to the grabbers located below the LeftHand and RightHand inside the BigHandsIntegration object.
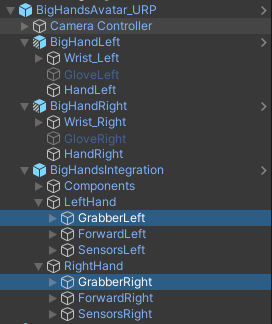
Both components currently reference the glove renderers, which you deactivated in favor of the hands. You need to reference the HandLeft and HandRight renderers that you activated instead. What this does is tell the grabbers which objects should be used to preview grab poses.

Possible next steps setting up your avatar:
- On the root GameObject, setting up the UxrStandardAvatarController component to add hand gestures based on user input.
- On the root GameObject, adding new poses to the UxrAvatar component by going to the bottom of the Hand Poses section and opening the Hand Pose Editor.
- Inside the BigHandsIntegration GameObject, setting up teleportation hanging from the ForwardLeft/ForwardRight objects.
- Inside the BigHandsIntegration GameObject, enabling laser pointers hanging from the ForwardLeft/ForwardRight objects to interact with Unity UIs. This will require creating an EventSystem in the scene (menu GameObject -> UI -> EventSystem) and adding a UxrPointerInputModule component to the EventSystem GameObject.
- Adding a UxrCameraWallFade component to the avatar’s Camera if you want to fade the screen to black whenever the user clips through colliders. “Allow Traverse” will only fade through the geometry while “Strict” will keep the screen black until the user returns to the original position.
Creating a custom avatar from scratch
You may also want to set up a custom avatar using your own rig and graphics. We have put special effort into providing a simple yet powerful way to set up your own avatar.
It all starts by creating an empty GameObject placed at floor level. Add an UxrAvatar component to it.
You will notice that there is immediately an assistant on top of the component that will guide you through the steps by looking at missing elements and offering an instant fix.
Let’s see what it can do automatically:
![]()
![]()
![]()
Woops! It seems we got our first roadblock.
![]()
This is because we haven’t placed anything hanging from the avatar yet. Let’s add our Cyborg geometry, we’ll drag the CyborgGeo asset under the avatar GameObject.
![]()
Let’s go back to the UxrAvatar assistant and try Fix again. It seems to work now!
Now we set the Rig Type to Half or Full Body since the avatar is more than just head+hands.
We see that there are some elements that weren’t found correctly (Upper Chest, Chest, and Spine) but the rest was automatically assigned and found, including all finger bones. Let’s assign the missing elements.
![]()
Going back to the assistant, we see it now offers a choice between using Big Hands or Small Hands for the Hands Integration. You can check the previous section (Using a UltimateXR avatar prefab) if you are not familiar with what the Hands Integration is.
![]()
Let’s go with the small hands this time. The hand size will not affect the avatar itself; it will only decide which hands are shown when the avatar Render Mode is set to Controllers. When the Controllers are rendered, the Show Controller parameter tells whether to also render hands on top mimicking the user input on the real controllers. These hands, rendered using IK, can either be the big hands or the small hands. It really depends on what you consider your own avatar hand size to be, so that it doesn’t feel different from the avatar that you created.
![]()
Once we have selected the small hands, we see that the assistant tells us that the avatar is ready to rock!
![]()
Let’s see how well the hand integration was automatically aligned with our avatar.
Open the SmallHandsIntegration object added to our avatar and select the LeftHand object. We see that it needs a little push forward so that both palms align. The goal is to make sure that the palm centers are approximately in the same place and that both palms lie on the same plane. Fingers can be a little misleading, it’s usually better to focus on getting the palms aligned.
Do the same operation on the right hand.
![]()
When selecting LeftHand and RightHand in the SmallHandsIntegration object, you may also have noticed that the inspector lets you choose which hands are shown when the avatar Render Mode is set to LeftController + RightController. Set up which combination you prefer.
![]()
The next step is quite critical for manipulation: Go to the GrabberLeft and GrabberRight objects hanging from LeftHand/RightHand and assign them the correct renderers for each hand. This will provide a way to preview grab hand poses when editing the pose properties of a grabbable object.
![]()
Now go to the UxrAvatar component and drag all the renderers in your avatar to the Avatar Renderers field. It can be useful to click the lock on the inspector to be able to multi-select all renderers in the hierarchy and drag&drop them to the Avatar Renderers.
![]()
To finish let’s go to the root GameObject and edit the UxrStandardAvatarController component. We can adjust the eyes height so that the gizmos shown coincide with the eyes on the avatar. All other values are good by default.
![]()
Now click Play to test the avatar.
It seems to work nice! That was easy right? We hope the assistant can help you set up many other avatars the same way.
Where to go from here:
- On the root GameObject, add new poses to the UxrAvatar component by going to the Hand Poses section and opening the Hand Pose Editor. You may need to click Create Prefab first to save the avatar you just created as a prefab.
- After creating hand poses, on the root GameObject you can set up the UxrStandardAvatarController component to add hand gestures based on user input.
- Inside the HandsIntegration GameObject, you can set up the teleportation parameters hanging from the ForwardLeft/ForwardRight objects.
- Inside the HandsIntegration GameObject, you can enable laser pointers hanging from the ForwardLeft/ForwardRight objects to interact with Unity UIs. This will require creating an EventSystem in the scene (menu GameObject -> UI -> EventSystem) and adding a UxrPointerInputModule component to the EventSystem GameObject.
- Adding a UxrCameraWallFade component to the avatar’s Camera if you want to fade the screen to black whenever the user clips through colliders. “Allow Traverse” will only fade through the geometry while “Strict” will keep the screen black until the user returns to the original position.
- Set up grabbable objects that the avatar can interact with.